

Every second counts in an emergency. When someone suddenly collapses, stops breathing, or becomes unresponsive, what you do in the first few minutes can determine whether they live or die.
You don’t need to be a doctor or nurse to help. Basic Life Support (BLS) is a set of simple actions anyone can learn.
This guide breaks it down in an easy, practical way.
What is Basic Life Support?
Basic Life Support is the immediate care given to someone whose breathing or heartbeat has stopped.
It mainly involves:
- Checking responsiveness
- Calling for help
- Doing chest compressions (CPR)
- Helping breathing if needed
The goal is simple: keep blood and oxygen flowing to the brain and heart until professional help arrives.
Step 1: Check for Safety
Before you rush in, look around.
Ask yourself:
- Is the scene safe for me?
- Are there dangers like fire, traffic, or electricity?
Only approach if it is safe.
Step 2: Check Responsiveness
Tap the person gently on the shoulders and speak loudly:
“Are you okay?”
If there is no response, assume an emergency.
Step 3: Call for Help Immediately
Shout for someone nearby to help.
Call emergency services or ask someone to call.
If you are alone:
- Call emergency services first before starting CPR.
If others are present:
- Point to someone and say:
“You, call an ambulance now!”
Step 4: Check Breathing and Pulse
Look for normal breathing for no more than 10 seconds:
- Is the chest rising?
- Is there normal breathing?
- Can you feel their breath on your check when you place it close to their nostrils?
At the same time, you may check for a pulse:
- Feel for the carotid pulse (one side of the neck at a time)
- Use 2–3 fingers (not your thumb)
- Check for no more than 10 seconds
If there is no pulse or you are not sure, treat it as cardiac arrest.
- If no breathing + no pulse → start CPR immediately
- If you are not trained to check pulse confidently → skip pulse check and start CPR
Step 5: Start CPR (Chest Compressions)
Place the person on a firm surface.
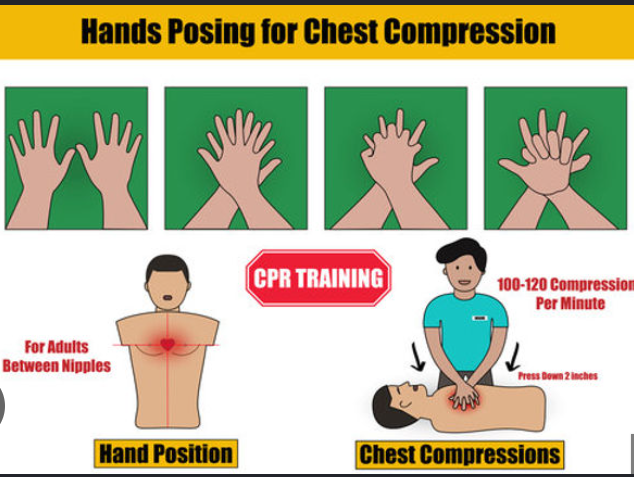
Hand position:
- Place the heel of one hand in the center of the chest
- Put the other hand on top
- Lock your fingers
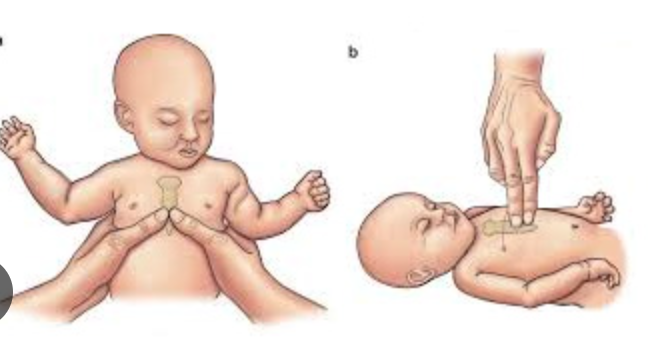
- NB: if it’s a child use one hand; if it’s a newborn or infant use
How to compress:
- Push hard and fast
- Rate: about 100–120 compressions per minute
- Depth: about 5–6 cm
- Let the chest come back up after each push
Think of the rhythm like the beat of the song “Stayin’ Alive”—it helps keep the pace right.
Step 6: Give Rescue Breaths (If Trained)
If you are trained and comfortable:
After every 30 compressions:
- Tilt the head back slightly
- Lift the chin
- Pinch the nose
- Give 2 breaths (just enough to see the chest rise)
If you are not trained, hands-only CPR is still very effective.
Step 7: Keep Going Until Help Arrives
Do not stop unless:
- The person starts breathing normally
- Medical help takes over
- You are physically unable to continue
What NOT to Do
Avoid these common mistakes:
- Do not waste time checking for a pulse if you are not trained
- Do not delay CPR to “wait and see”
- Do not give food or water
- Do not stop compressions frequently
Summary
Brain damage can begin within 4–6 minutes without oxygen.
Early CPR can:
- Double or triple survival chances
- Keep oxygen flowing to vital organs
- Buy time until advanced care arrives
You may think you are just a bystander—but you could be the reason someone survives.
Basic Life Support is not complicated. It is a skill built on three actions:
Call. Compress. Continue.
If more people knew this, thousands of lives could be saved every year.
Learning BLS doesn’t just make you prepared—it makes you powerful in emergencies. Learn more